In this lesson we are going to learn how to draw circles with Python Turtle Graphics. We will then modify the default circle method so that we can centre our circles at specific (x, y) coordinates, and then have some fun some with creating an archery target and adding some interactivity.
As you may already know, Python Turtle Graphics is fantastic way to learn about programming and also about Maths. In general there seems to be little integration between these two subjects at school level, which is something I hope to see change. Many of my posts on this blog are written to help further this cause. See Computer Maths Category for related posts.
Before we start, please note that there are many ways to achieve the same goal with Python Turtle Graphics. While this can be a good thing, it can also lead to confusion. For this reason I have done things is a certain way which I consider gives the best foundation for making full use of the potential of this module. For example:
- I create a
screenobject so I can control its colour and title etc. - I use functions which have an existing turtle as an argument, to help discourage the use of global variables and provide added flexibility, so the same function can work for multiple turtles.
Don’t worry too much about these details if they don’t make total sense to you. The code is fairly self explanatory and there are comments to help.
Drawing Circles with Python
The default way to create circles in with Python Turtle Graphics is to simple use the circle method, as in the following example.
import turtle

# Set up screen
screen = turtle.Screen()
screen.title("Circle")
screen.setup(450, 450)
screen.bgcolor("cyan")

# Create a turtle
toby = turtle.Turtle()
toby.speed(0)
toby.width(5)
toby.hideturtle()
toby.color("red")

# Draw a circle starting at (x, y)
radius = 100
toby.circle(radius)

# Make it all work properly
turtle.done()
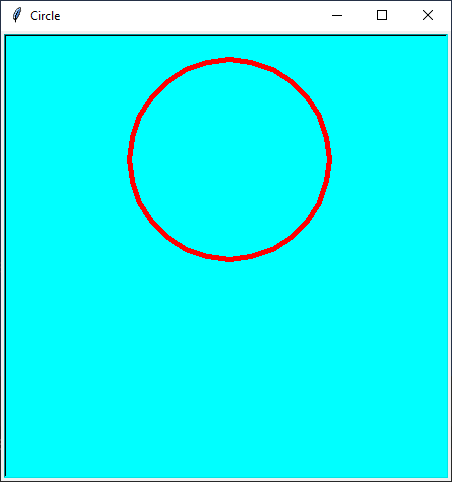
This is fine for many purposes, but it can be frustrating as it doesn’t give you control of where the centre of the circle is. Notice how in the example above the circle is not centred at the location of the turtle (called toby), which came into existence at the default location of (0, 0). Using the default method, the circle is drawn from the staring point, so the starting point is on the circumference.
Drawing Circles Centred at (x, y)
The next program demonstrates how to draw circles centred at specific (x, y) coordinates. It does this by use of a function draw_circle() which takes several arguments as described in the code.
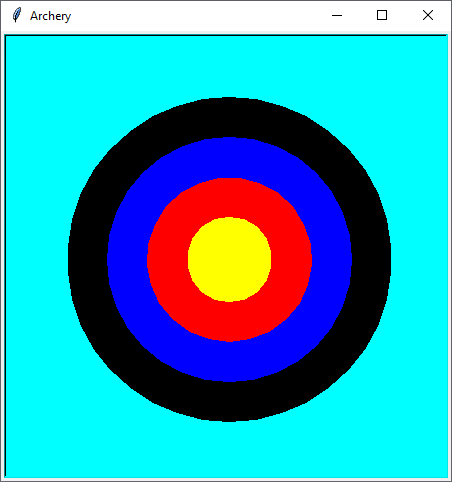
Using this function, it is relatively easy to draw an archery target. See the program below.
import turtle


def draw_circle(tur, x, y, radius, color="black"):
    """
    Draws a circle with center at (x, y), radius radius and color color.
    Create your turtle elsewhere and pass it in as tur.
    """
    tur.color(color)
    tur.pu()
    tur.goto(x, y - radius)  # -radius because the default circle method starts drawing at the border.
    tur.pd()
    tur.begin_fill()
    tur.circle(radius)
    tur.end_fill()


# Set up screen
screen = turtle.Screen()
screen.title("Archery")
screen.setup(450, 450)
screen.bgcolor("cyan")

# Draw the target
toby = turtle.Turtle()
toby.speed(0)
toby.width(5)
toby.hideturtle()

draw_circle(toby, 0, 0, 160, "black")  # Draw a black circle at coords (0, 0) with radius 160 pixels
draw_circle(toby, 0, 0, 120, "blue")
draw_circle(toby, 0, 0, 80, "red")
draw_circle(toby, 0, 0, 40, "yellow")

# Make it all work properly
turtle.done()
This program makes use of lots of features which you can use in your own programs. You can use as much or as little as you like, but experiment with the ideas. If you don’t have many ideas, try just making small changes, like changing the colours or sizes of the circles. Some of the colours available in Python Turtle Graphics can be found here.
The Next Level
This section contains some more advanced Python programming techniques, so if you are a relative beginner, you may want to leave it for later on.
For example it includes
- Event detection with Python Turtle Graphics
- Event callback functions
- Passing additional arguments to a callback using
lambda
import turtle

CROSS_SIZE = 20


def draw_circle(tur, x, y, radius, color="black"):
    """
    Draws a circle with center at (x, y), radius radius and color color.
    Create your turtle elsewhere and pass it in as tur.
    """
    tur.color(color)
    tur.pu()
    tur.begin_fill()
    tur.goto(x, y - radius)  # -radius because the default circle method starts drawing at the border.
    tur.pd()
    tur.circle(radius)
    tur.end_fill()


def draw_plus(tur, x, y, length=CROSS_SIZE):
    """
    Draws a cross centered at (x, y) with existing turtle tur and length given by CROSS_SIZE.
    """
    tur.penup()
    tur.goto(x, y - (length / 2))
    tur.pendown()
    tur.goto(x, y + (length / 2))
    tur.penup()
    tur.goto(x - (length / 2), y)
    tur.pendown()
    tur.goto(x + (length / 2), y)
    print("Mouse click at", x, ",", y)  # for useful feedback about where you clicked.


screen = turtle.Screen()
screen.title("Archery")
screen.setup(450, 450)
screen.bgcolor("cyan")
screen.listen()

# Draw cross when screen is clicked
cross_turtle = turtle.Turtle(visible=False)
cross_turtle.color("green")
cross_turtle.width(4)
cross_turtle.speed(0)
# The lambda here is a useful trick to enable additional arguments to be passed to the onclick callback.
screen.onclick(lambda x, y, tur=cross_turtle: draw_plus(tur, x, y))
screen.onkey(lambda: cross_turtle.clear(), "space")  # Clear crosses on keypress.

# Draw the target
toby = turtle.Turtle()
toby.speed(0)
toby.width(5)
toby.hideturtle()

draw_circle(toby, 0, 0, 160, "black")  # Draw a black circle at coords (0, 0) with radius 160 pixels
draw_circle(toby, 0, 0, 120, "blue")
draw_circle(toby, 0, 0, 80, "red")
draw_circle(toby, 0, 0, 40, "yellow")

# Make it all work properly.
turtle.done()

There are lots of ingredients here that you can use in your own projects. As before, go ahead and edit bits of the program or use bits in you own project. The program is not currently a game as such, but I expect it could be made into one. Can you think of how? I’m thinking some kind of random positioning of the crosses or reflex-testing game. We haven’t looked at timers and animation in this article, but for sure they are possible with Python Turtle Graphics. It may be that an idea you have might become possible with a bit more knowledge, so maybe make a note and come back to it later. If you have an idea that you want help with, let me know in the comments and I’ll see if I can help.
This lesson has shown you how to draw circles using Python Turtle Graphics and then how to improve the basic functionality and add some interactive features. I hope you found it fun and interesting.
Happy computing!
Compare your code with mine:
=======================
from turtle import *
ht(); bgcolor("cyan")
colors = ["yellow","red", "blue", "black"]
for i in range(3,-1, -1):
dot(150*i+100, colors[i])
done()
Yes, it is nice and succinct. It uses the procedural interface, which I generally discourage as it greatly limits what is possible with Turtle Graphics, and means students have to relearn when the switch to OOP. But it certainly has its uses.